

Founder | BPI® Energy Auditor Certified Professional
As I was vacuuming up the dust for what seemed like the 100th time at the end of another long day of renovations, I asked myself, “What have I gotten myself into again.”
It was probably six months into this second netzero home renovation here in Saint Petersburg, FL. The handymen and contractors were fighting with each other, some quitting onsite, and it was like pulling teeth to get any decent bid or anyone to show up in the first place with the 20-30 others I spoke with. “I’m not cut out for this,” I thought.
These are my first thoughts when I reflect on how this project went. It also felt like it was twice as hard as our first netzero home, my first renovation ever, and largely an experiment to try to power the entire home and electric car through affordable efficiency and solar.
This is the story of how this second renovation turned out.
Throughout the article, I will list the many lessons learned. Not just about going netzero, but trip-ups and mistakes that hopefully you can avoid with any renovation you might want to tackle.
You can also expect to see lots of before and after pictures, real numbers, and then of course, how it all turned out. There is now about a year’s worth of solar production and energy usage data to pull from.
For an update as of the end of 2023, I included a section on how this is now a successful netzero rental home as well. Also included are the updated financials to see how it’s panned out.
This is a long one, so use the table of contents below to skip around if you like. So here goes –
What is a Netzero Home?
With the word “netzero” being thrown around a lot lately, I’d like to define it quickly. You’ll see a lot of different ways that people use the term, but in general:
Being netzero means that you produce as much energy as you use.
“Zero emissions” and “carbon neutral” are other terms that pretty much mean the same thing. You’re basically offsetting any energy or environmental impact you create by existing (no pressure).
Goals For This Home and Our Mission
Regarding my particular goals with these home renovations, I wanted to take it a step further. I wanted to power not only the house but power at least one electric car also.
That is actually the whole mission of starting this website and business – to prove that being fully netzero is not only possible but affordable.
And beyond that, it turns out that you can use these methods to save a lot of money, get an excellent ROI (return on investment), and incorporate this into traditional real estate investing principles to build wealth over time.
Additional Netzero Home Goals
There were a couple more goals that I wanted to maintain while doing this project, again to keep the project realistic:
- Keep the total cost under the median average home price of the area.
- Ensure it can rent out for 10-15% above all ownership costs, including long-term maintenance.
Keeping the Project Realistic in This Economic Environment
Why these two goals above? The first one is to keep the project realistic and within the grasp of the average homebuyer. I’ve seen very cool and fancy netzero homes, but they are often double the price of the local area’s median home, which also means it’s out of reach to most buyers and especially at today’s higher mortgage rates.
It’s hard these days to save up to afford a home or even save beyond a few paychecks. The angst of inflation eroding our purchasing power while asset prices go up continuously causes people a lot of anger and stress.
And maybe this includes yourself. So while grocery bills, prices at the pump, and every other cost go through the roof, who would even care about netzero or saving a couple hundred a month on the energy bill? Super frustrating.
So that’s why we need to keep the costs reasonable, or this whole concept won’t get a serious look.
Make Sure It’s an Investment First
These actually incorporate my own personal rules for real estate investing. Ones that will keep you out of trouble and use as a wealth builder.

Homes are typically the biggest asset we will ever own. If done right, they can be an amazing tool for saving for a stable retirement, act as an inflation hedge, or, dare I say, create financial freedom. We have a very in-depth article on the benefits of owning just one home in your lifetime if you’re interested.
Regarding the rule above about making sure you can rent it out for more than it costs you to own, this just gives you freedom.

Things come up in life. A family member gets sick, the market turns (You have negative equity if you sell it), you get a new job out of state, etc. If you can always rent out your home for more than it costs you to own (all expenses, maintenance, taxes, etc), then you have a true asset, not a liability.
You can essentially keep it forever no matter what the market does and make some rental income while hedging against inflation. This is a big part of why real estate is the greatest wealth-builder of all time.
The Renovation of This Netzero Home
The actual work on the house took about seven months, but there was probably 1.5-2 months of planning and just figuring out what the heck I was going to do in the first place.
The Home Itself – Why I Chose This one
The short answer of why I chose this home is because it was on the market, and we had a slight chance of actually going under contract. That’s it.
Back in May of 2021, the market was still insane. Interest rates were crazy low (around 3%), and everyone wanted to move to Florida. This meant that there were usually tons of offers on any home that came on the market, at least half of them cash at that.
Lesson: If you’re in a competitive market, having a true professional as a real estate agent is a must-have.
I haven’t always used realtors, but in this case, I had to. I was moving into a new town, didn’t know the area, and didn’t know the local players involved. In a market like that, you need someone who is going to close the deal.
By the way – shoutout to Laura Marie, a top producer in St. Pete, and I’d recommend her wholeheartedly to anyone looking for an agent in the Tampa Bay/St. Pete area. She will get the job done and has also become a great friend.

We went under contract sight unseen because we had no choice, really. I wasn’t in St. Pete then, but we had to move on. Appraisal contingencies waived, roof repairs, tons of fixes to do before passing inspection (for the insurance company), and a ton of other stuff to work out. But we got it!
Macro Economics and Riding the Inflationary Wave
One big reason for wanting to buy a house at what seemed like crazy prices and in a crazy market was more from a macro-economic perspective.
The general world macro-cycle we were in last year meant that borrowing was still cheap, and assets were booming. While the booms sometimes lead to busts, history shows that in inflationary decades like we’re in now, it still makes sense to own assets.
And to return to my rule – I could rent this out for more than it cost me to buy/own.
Tip: Learn a bit about our economic cycle to give yourself a financial tailwind. This is a great post to start on that journey.
Market update for end of 2023: The party is over. The Fed raised interest rates to cool down the economy on purpose, and real estate has immediately scaled back due to mortgage rates skyrocketing to around 8% (for good-credit borrowers). The boom cycle has ended, but maybe that means returning to a regular market with slow appreciation over time. But who knows.
Home Characteristics and Differences From The First Netzero Home
This is a 50’s concrete block home, with 1,140 square feet on a 2ft crawlspace. It had pretty much original everything. Cloth wiring, plaster and concrete curved walls, sunken original hardwood floors (from soil settling), rotting subfloors, and a lot of other not-fun things I discovered along the way.
The first home I did was built in the ’80s. Typical drywall on a concrete slab, and just much more straightforward.
I mention the difference because, at least for me, this turned out to be a ton more time and cost. Here are some reasons why:
- I personally find plaster 2-3x harder than regular drywall to work on.
- We swapped out the old cloth wiring (old and exposed wire, ungrounded circuits) with new Romex grounded circuits, which cost thousands of dollars.
- The entire floor was sunken about an inch around the house, completely open to the outside
- A new roof needed (actually good for a solar install)
- Old, leaky faucets and fixtures
- Mold found to clean up immediately
The list goes on. But the fact was that if I wanted to buy another house that was in line with the average local price, I’d have to accept these things.
Planning The Netzero Project
I wasted a lot of time and money on this one, to admit fully here. I also probably wasted a lot of contractors’ time on bids, planning, and other things. I won’t say it was too crazy, but many lessons were learned here.
Lesson: Have a plan, and don’t rush it.
I spent weeks of wasted time and thousands of dollars figuring out what I was actually going to do. At first, I planned to reconfigure half the house to add better flow, a new master suite and master bath attached, and more.
The short version of this is that I spent maybe a month, $3,000 of an architect’s fee, and many bids from contractors to realize that it would be about $50,000 to reconfigure about 500sq ft of the area without even adding more space in the house. Well, that all went out the window, along with the design fees.
Blower Door Testing – Measuring the Air Leakage
A good first move before starting any energy efficiency or netzero home project is to test the air leakage in the home.
Air sealing is little known as a general efficiency measure, but it’s usually the most impactful. Homes basically act like a leaky boat, with hundreds of holes in it. These gaps in the building envelope let unwanted air in and out, making it really hard to keep the air inside [air] conditioned.
This means your HVAC will run a lot more than it should, burn out quicker (you’ll replace it faster), and lead to less comfort in the home. You can check out our Ultimate Guide to Air Sealing here if you’re interested in learning more about air sealing.


So we did the blower door test, and the home failed miserably. It scored a 21.9 ACH50. To put that in perspective, homes must be below a six by code (at least in Florida). So this old home was 3600% worse than most leakage code allows. Yikes…
We also measured the ductwork leakage and went around the house with the infrared camera to check leaks and insulation from behind the walls (where you can’t see).
Our first netzero home scored a 6.8 ACH50 or so before any efficiency stuff was done, which we got down to the mid-3’s after all the efficiency work. This just speaks to how different every house is. This also speaks to some real problems this house has in terms of efficiency.
Things We Can Figure Out With a Blower Door Test Score
With this crazy high test score (the house was ultra-leaky), we can figure out a few things now:
- The settling of the floors and soil over time led to a huge gap between the baseboards/walls and the floor, creating a huge air gap around half of the house.
- The previous owners installed a 3-ton HVAC unit in a 1,140 sq ft house. Normally, this would be much too big. But it makes sense that anything smaller probably couldn’t cool the house fast enough since so much air was being leaked out. So now a super leaky house leads to an oversized HVAC system and higher bills. The system also cycles on and off so much that I’ll probably have to replace it before it normally would go out. I’ve had to spend much more money on maintaining this 2019 unit due to burned out circuit boards and other random things due to it’s poor design.
- Bugs can get in anywhere they want.
- There was no insulation under the house at all, it is just open with 70-year-old hardwood floors (tons of mini-gaps).
- Then add all the normal air leaks behind the walls and attic.
So right away, with all this considered, we can figure out that sealing up this house even to get to code would be incredibly daunting and expensive.
It would involve things like sealing the crawlspace, sealing the attic, sealing every little gap we can find, all window openings, doors, and the rest.
You’re probably talking $15,000 to $20,000 or more to do all this.
Since the goal is to keep the payback low and ROI high, I knew right away we’d have to go about this journey to netzero differently, at least on this house. I also knew from the first house I did that, at least in Florida, the payback on solar would be slightly less than much of the air sealing projects mentioned above.
Tip: Sometimes, just adding a few more solar panels (if they fit on your roof or property) is the simpler and more effective option vs. doing much more expensive efficiency projects. While it’s not ideal, sometimes just producing a little more power to get to netzero rather than saving makes more sense financially.
The Remodel on This Netzero Home
I’ll cover the main areas of the home below. This section covers things that will happen in any renovation, not necessarily the efficiency or netzero part. You’ll see a few things were done to be efficient, but largely it’s like any other fix-n-flip type of thing.
The Hallway Bathroom
This is the main bathroom in the house, other than the second one out in the garage. It’s a typical 6x8ft smaller bathroom. The first picture doesn’t look that bad, but this was really dated and run down.
The floor was rotten underneath, as you could bounce on the old tile stacked on each other through the years. As you can see below, we gutted everything.
Starting with replacing and repairing the subfloor, this whole thing took about four weeks. I interviewed about eight contractors/handymen that came recommended by my realtor. Since I was new in town, I didn’t know anyone, so these leads were good.


It started out well with him, and everything was great for the first three weeks. We discussed a flat rate of $3,500 in labor, and I would supply all the materials. Well, that never goes to plan. One day I asked him if we were still on track to finish the $3,500, and he said it would now be $5,000. Naturally, a little argument ensued.
The short version is that I thought we were operating on a flat rate fee because that’s what he quoted me. In his head, he was working hourly – $60/hour.
Lesson: Always confirm exactly what your payment structure is, the not-to-exceed amount, and get it in writing.
It’s hard not to beat yourself up with these types of home projects. Having run multiple successful businesses myself and dealing with this stuff for 12+ years, we still make these rookie mistakes.
In this contracting/renovation world, it’s so easy to lose your ground and give up the basics of smart business just to try to get the job done. In this case, it was my only main bathroom, blown up for 4+ weeks, and you are beholden to someone to finish the job unless you are going to do it yourself.
In the end, we got to $5,000 and agreed just to cut ties. No one was feeling good, and there was a lot left to do there. I had to take care of the sink and faucet installation, painting and texturing, the bathroom vent fan, and other odds and ends.
All in all, this bathroom probably cost $9,000 in labor and materials.


The Bedrooms
Luckily, these were pretty straightforward. Due to the labor shortages and everything, it was like pulling teeth to try and find any help (that was reasonably priced…).
For these rooms, I did these myself. Pretty much just a refresh and new everything. I built a new closet wall, added paint, new Energy Star ceiling fans with LED lights, square-edged modern baseboard, and more.
I’m not an expert DIYer, but the thinking was this: I can literally save hundreds of dollars per day if I just dive into this and do it myself. While it took me away from my business and building this blog, it sometimes just makes more sense to get it done.
Lesson: If it’s becoming too hard to find people to do the work, just dive in. Watch a few YouTube videos on whatever project it is, go to Home Depot 3x per day, put on some podcasts, and just do it.
Here’s how it looked before and during the project:


It will feel rewarding when it’s done, and you’ve saved potentially thousands of dollars and learned a new skill.
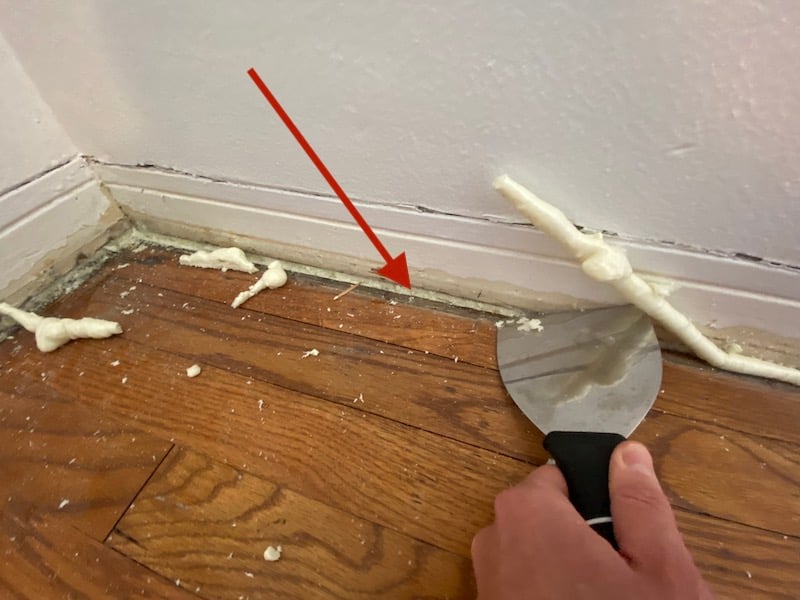
Air Sealing Around the Outside of The Room
Air sealing was important because the floors had been disconnected from the walls, with huge gaps between the floor and the old baseboard. After we ran new Romex grounded circuits around the room to the outlets, I used canned spray foam to seal up the entire outer wall.
Total cost for the bedrooms: Less than $3,000 because I did all the work myself. This includes new solid-core doors, barn door style closets, and things.
And here’s how they turned out:


The Living Room
The living room took months to do because there’s so much involved. It’s in the center of the house, and all the electrical runs through it. It also acted as a storage room for months while other rooms were getting done. This reminds me of another big suggestion if you’re renovating a house:
Lesson: Try, if at all possible, not to live in the house while renovating it.
This was my second go-around, and it was through the added stress of the pandemic. Yes, I saved money and took advantage of the lower primary residence mortgage rates and things, but money is not everything.


The mental toll living in a home renovation takes on you cannot be described. You have nowhere that feels like home, in your own home. Contractors are in and out as they please, and you have storage stacked up to the ceiling everywhere, among other things.
You have to clean, vacuum, and change air filters almost daily. There’s just no room to relax. This was extremely mentally unhealthy, and I’m never doing it again.
Everyone’s situation is different, but I plead with you again. Think long and hard about the money savings vs. the project you’ll be living in for months and what that might do to your and your family.
So this living room took months. We redid everything. New wiring, the new ceiling can lights, paint, skim coating the old walls smooth, drywall repair, paint, and all the rest.
There’s so much to type in detail about each room and all the little projects, but I’ll stop there for now. Here’s how it turned out:


Hallway – Raising the Ceiling One Foot
In the hallway, we added all new doors, paint, and a new air conditioner return vent and basically cleaned up the whole space.
I wanted to mention the difference that raising a ceiling can make. For whatever reason, the hallway ceiling was only 7ft tall, while the rest of the house had 8ft ceilings. So as you walk through the house, you’re going from high to low to high again.
My neighbor had renovated his house (identical to mine), and the hallway ceiling was 8ft instead of 7ft to match the rest of the ceilings, and it made a huge difference.
So for about $1,500 or so in total, we went for it also –


It’s a lot of fun working in the Florida summer with the ultra-hot attic air coming in. But hey, that’s what I signed up for. I think it turned out pretty nice, and having the 8ft continuous height throughout the home is well worth it:


The Kitchen and Dining Room
Since starting this renovation and netzero journey, I have wanted some gloss white euro cabinets. It didn’t make sense in the last house due to cost, but I took the plunge this time! It was only maybe $500 more for the upgrade, but it was worth it for this area and general home prices.
Tip: While spending as little as possible on a renovation makes sense, sometimes it’s better to go one or two levels above the basic renovation material quality to make your project stand out and extract the maximum amount of value possible for your local market.
The kitchen and dining room were another four weeks of dust, contractors in and out, and infinite pizza deliveries. You can’t cook, you barely can open the fridge, and there’s nowhere to sit.
Lesson: I find that bathrooms and kitchen renovations are the most unsettling areas of a home to work on when you live there. They upset your daily life the most. Make sure you plan these out ahead and consider the speed of the project your potential top priority.
We demo’d the entire kitchen, raised the soffits to make the room all 8ft tall, and redid basically every single thing.


The dining room is small and wasn’t that big of a deal. Skim coating, new paint, new light fixtures, baseboards, and other things to refresh it next to the kitchen.
There were tons of mistakes and lots of wasted money in this part of the project. There are too many to list, but here is a couple that stands out. –
One of the younger guys working in there had wired up a new outlet wrong. I asked if he read the instructions, and he blew up at me. He started screaming at me and said, “You are not my father!!”.
Of course, I was just speechless. You’re standing in a blown-up kitchen with someone yelling insane things at you. I decided it just made sense to pay him for his hours, then kindly dismiss him. He said a lot of other stuff, but it’s not worth going on about.
Lesson: Sometimes, you just have to keep your cool to get out of the situation. You don’t know what anyone will do these days, in terms of retaliation or otherwise, so it’s best to move on, even if it costs you a bit of money.
Another huge mistake was not checking out the previous work of this other handyman. Basically, we got all the way through doing penny tile on the kitchen walls (which took him 1.5 weeks), and then he let the grout dry, ruining the entire backsplash.
I had to buy all new backsplash, and we went over the penny tile. This was double the labor (new installer) and double the materials.
Lesson: Confirm that handymen and contractors can actually do a good job. Check references and previous jobs.
Another Lesson: Assume that one or two major projects in your renovation are going to go completely south. Budget for having to redo these entirely.
But this is how these renovations go sometimes, especially if you’re managing them yourself. It turned out nice, though:


The Garage, Garage Bathroom, and Laundry
It’s weird, but many homes around here have their second bathroom in the garage. While not ideal, the market dynamics showed that it still made sense to renovate this area.
The original bathroom in this garage was a horror show. Tiny, dated, and just completely gross. Sorry in advance for these photos..


The washer and dryer were also just on the garage floor, in the way of parking and walking around in there. I wanted to reconfigure the entire area by expanding the bathroom, creating a stackable washer and dryer area in the corner, and basically completely opening up the garage.
Here are some project pictures. This took about six weeks, with one contractor working 4-5 days a week:


At least the inside of the house was mostly done at this point so that I could live in that area like a normal house.
The first contractor didn’t enjoy the work out there, and from my end, he started showing up late, working slower (he was hourly), and over the last week or so, our relationship fell apart. After an awkward conversion, we decided to part ways.
Lesson: Contractor relationships usually start out great (the honeymoon period), but they oftentimes deteriorate with lack of communication, people getting comfortable, and a lot more. Be aware of this and have things in writing with clear goals. It’s hard.
With the help of a couple more (new) contractors, here’s how it turned out:


The New Heat Pump Hot Water Heater
This is a big one in terms of yearly energy savings. The old water heater was a 30 gallon, but still used over $500 per year in electricity usage to heat the water.
New heat pump water heaters use about 20% of the energy of traditional water heaters, and look and install basically the same as the old ones. They do make a bit of noise (you don’t want them near your living rooms, bedrooms, kitchens, etc unless they are dead quiet), but they are perfect for garages, basements, and other open areas that won’t bother you with noise.
Home Depot and Lowes now usually keep these in stock, or they can be shipped quickly. You can check out some more affordable models here if you like. Even many contractors don’t know about this technology or how to install them yet, but it’s a huge energy savings.


This new Rheem one has a 10-year warranty, and you can see in the pictures that it only uses $104 per year. These EnergyGuide labels assume a certain kWh electric rate, which I believe it’s 12 cents.
Adjusting for inflation and the crazy bill increases we’ve had lately, I estimate the actual yearly savings is now around at least $500 per year just by swapping out this unit.
Another cool fact is that by swapping out the water heater to a new heat pump unit, the energy savings will power my Tesla Model 3 for the entire year. The savings equals about the same as the car uses throughout the year.
That’s kind of crazy (but cool).
House Interior is Finished
The interior of the house is pretty much done now. This all cost somewhere approaching $80k, believe it or not. Prices of material, delays, labor, and my personal non-businesslike mismanagement of a lot of this probably accounted for 30% of that.
One big lesson: I should have hired a contractor to do this project all at once, even if it would have cost $15,000+ more.
If you’re not a professional flipper, really great DIYer, handyman, or tradesperson yourself, the above statement is one to at least consider very seriously. It would have personally saved me months of time and probably would have been higher quality work.
Yes, there are always hiccups and nightmares with contractors as well, but still.
But where do you find contractors? Word of mouth is tough, especially if you’re new to the area or not in the industry yourself. The next place to go is to search online.
Check out this extensive write-up where I list many of the best places to find contractors online. You can see that here.
The New Roof
The new roof was a must, not just for the house itself but for solar energy. The original one was from 2005 and barely hanging on. In Florida, regular shingle roofs degrade quickly due to the heat, humidity, rain, hurricanes, and other reasons.
Tip: If you’re near a roof replacement and considering solar panels going up there, get the new roof first.
At least around here, companies charge $200-300 per panel to take solar panels down and put them back up in between a reroof. I have 20 panels here, so that would be around $5,000 just to mess around with the panels.
The new roof was $9,050, and that included $1,500 for new hurricane ties, which are a massive homeowners insurance savings piece. They essentially tie your old roof/trusses to the home’s walls, preventing it from blowing off during a hurricane.
Doing the hurricane ties cut my homeowner’s insurance in half, saving $1,092 per year. If you’re in a hurricane zone, you may want to look into hurricane ties if you don’t have them already.


They were done in about 1.3 days, and there were probably ten people up there working at once. Amazingly efficient and a breath of fresh air!
Time for Solar Energy!
This is always the exciting part, at least for me, because it means the project is getting finished.
For at least the way I do these netzero renovations, solar is literally the last thing you do. This is because you generally take care of all the lower-hanging efficient fruit first to get your bills down, then calculate the amount of solar energy needed throughout the year to power the home and your electric car(s) if you have them.
This property has lots of shading on the east side, and the roof faces aim east and west. Ideally, you want a southern-facing roof that’s clear of any shade, but east and west produce only about 5-15% less power depending on a few factors.
More Solar Panels vs. Energy Efficiency Projects
So it’ll work, you just need more panels, which also assumes you have enough roof space. This also means your ROI will be a little bit lower (with your payback higher), but in my case, it still made tons of sense.
You might have noticed above that I didn’t include much efficiency work when renovating the different areas. They were pretty much renovated as normal. Yes, we did close up gaps and holes and things while the drywall was going in and things, but overall it was pretty standard.
This is because every major efficiency project would be thousands of dollars, with a much higher payback than solar would be, at least for this house in this area. The HVAC system was already kind of new, and the attic had basic fiberglass insulation. The crawlspace was open, but again thousands of dollars would probably only cut the bill by 10% or so, which is like $15 per month.
I did build some more complicated calculators and things to measure all this, and in the future, I actually plan to turn all this into an organized online course so any homeowner can tackle this themselves.
Yearly Energy Usage For Both The House and Electric Car
But anyways, this is why we calculated to make up for all the energy with solar. For this house, I calculated the year’s energy usage, including 10,000 miles per year with the Tesla Model 3 EV.
After running the calculators, I estimated the house and car would use about 10,600 kWh per year in energy combined, so I designed the solar array to match that by using both the east and west-facing roofs.


The solar software is pretty cool these days. They can consider the yearly shading vs. sun radiation, seasonal changes, and more to map out your estimated solar production vs. usage.
We played around a bit with the design, and ultimately I went with 20 solar panels for a total of 7.6KW. We used Q Cell all-black panels with Enphase iQ7+ microinverters.
The microinverters are a big deal because they let each panel produce its own power separately. That means if shading hits the panel next to it, it’ll still produce at 100%. An older central inverter system would have a whole string of panel production go down because there’s shading on one part of one panel.
The Cost of the Solar Electric Install
The total cost installed was $16,720.00. After the 26% solar federal tax credit, the net cost is $12,373.00 (payback and ROI numbers are in the below section).
We got it at $2.20/watt installed. This is considered pretty low. But I really shopped around for a reputable company that had been in business for many years. They knew I was not messing around and had no marketing fees since I called them directly.
Tip: When shopping for solar, call up companies directly. This can save them thousands of dollars not spent on lead generation companies or paying commissions. You can ultimately spend less on solar and save everyone money this way.
The Solar System Install
The installation went pretty smoothly and took a few days in total. The general procedure is measuring and putting the rail mounts into your roof first. Then you put the racking system on, run electric, and the panels go on last.


You can’t get excited because the local inspectors still have to sign off on it before you can turn the system on. This usually takes 1-2 weeks.
And in fact, this is the second time inspectors failed the initial inspection for wrong stickers being put on the breaker boxes and meters. These were two different companies and two different areas on these netzero home renovations. It’s crazy to think they will fail inspection for a sticker, but be ready for anything.
Netzero Home Renovation Numbers – Payback and ROI
There’s so much more, but this article is already crazy long (thanks for sticking with it up to this point!).
Let’s get to the juicy stuff – the investment return numbers. Like the first house – I do these projects as if they were a traditional real estate investment. That means that all projects have to make investment sense, with a reasonable payback on your money.
Yes, you certainly get the environmental benefits, but we must be realistic. I haven’t seen much happen in the sustainability world without it making monetary sense first, and I’ve now been in this fifteen years. So, in my opinion – if we can get the numbers to work, the projects will happen with much less resistance. And that ultimately benefits the environment.
The Numbers
3 bed / 2 bathroom / 1 car garage 1,140 sq ft home in Saint Petersburg, FL built in 1954
Purchase price: $312,000
Total project cost: $121,000 (and change)
Total spent: $433,000
Per Zillow, the average area home for this zip code was just above $600,000 at the time, so we are well below the average home price and in the average household income affordability range.
Yearly home electricity savings: $832 ($69 per month)
*The actual savings is much higher, but Duke Energy put into place a $35/mo “minimum bill fee” that gets tacked onto my bill after solar went on. So I have included that $420 amount in the savings because it’s a real fee; unfortunately...it would otherwise be $1,253 savings per year on this small house.
The good news is, the gas savings from driving an EV adds up to more than the house:
Yearly Tesla/EV savings from not buying gas anymore: $1,069 ($89 per month)
Total yearly house electric and gas savings: $1,901 per year
Value if I were to list the house on the market per the appraiser’s opinion: $530,000 to $540,000 (updated for November 2023).
I’ve since added a backyard deck, and totally landscaped it as well. This adds maybe $20,000 in home value, but the overall market has dropped since its peak.
Mortgage payment with 20% at 3.125% (started May 2021): $1,002.40 per month
Property tax payment per month: $646.17
Homeowner’s insurance per month: $115.42
Water, trash, sewer bill per month: $115
Monthly utility solar net-metering “minimum bill charge” fee (they still want your money) even if net-zero: $35
Assume $1,500 per year in ongoing maintenance (to be safe): $83/mo
Total monthly cost to own: $2,003.99
A Great Netzero Rental
Since May of 2023, I’ve had it rented out to a very nice couple. It rented out after one day on Zillow for $3,400 per month furnished. I left all the furniture in there, and really like furnishing my rentals in general. It provides a lot of flexibility, and people are much more mobile and transient these days as well.
But to get down to it – that’s a gross profit of around $1,400 per month, well above a cushion needed to handle maintenance, vacancy, and hopefully hurricane repairs, among other things.
The monthly cost to own vs. the rental value is really the key to long-term wealth building. Even with all the extra net-zero home expenses, the numbers work.
Goals met? Yes, definitely!
Now, there have already been unforeseen expenses (if you want to own rentals, get ready). The whole entire old orangeburg sewer system on the property had to be replaced for a near $6,000. I had to spend another $600 for the ongoing A/C maintenance mentioned above, and another $750 to remove two dead oak trees.
If you don’t have this profit cushion per month on the rental, you will be underwater very fast. This is the case with nearly all real estate investing.
Efficiency and Solar Standalone ROI
But how do we look at the efficiency and solar upgrades? Due to the nature of the project and trying to maximize ROI, many efficiency projects were not done. This means that only about $4,000 of efficiency work was done, and the rest was solar at $12,373 after the tax credits mentioned above.
Combining the two, that’s $16,373 (roughly) spent on efficiency and solar. Because we’re saving a total of $1,901 per year in total between the utility bill and no gas with the car, the return on investment is $1,901 / $16,373 = 12.36% return on my investment. This equates to an 8.6 year payback.
Depending on your viewpoint, you might think that’s fantastic, so-so, or terrible. For me, these aren’t blow-me-out-of-the-water numbers, but I still love it. Here are a few reasons:
- I’ve now hedged against both utility bill and gas and oil prices with the car. I have effectively capped my energy costs at today’s rates for 30 years into the future (or however long the solar panels last).
- It’s relatively risk-free. Aside from the solar panels flying off the roof during a hurricane or something, this acts more or less like fixed income or a bond. I’ll take 12.3% ROI any day, given the average stock market/S&P earnings is lower than that, and much more volatile.
- I found out through my first house that having a netzero home as a rental brings in really cool tenants! They want to charge their EV’s and have solar, and that’s ultra-rare these days. They look after your house as you would, because it kind of becomes a team effort.
- It feels good being more or less carbon neutral and actually moving this whole netzero idea forward.
- Many more, but I’ll stop there.
Home Value Gain From Solar Included
If you want to include this in your return on investment, studies show that home value can go up with you install solar, but you must own or finance it, not lease or rent the panels.
If we can assume the home value went up by 3% (conservative estimate) from going solar, we can effectively add back $15,000 to the net cost of efficiency and solar. So now our net cost is $16,373 – $15,000 = $1,373 net spent after tax credit and home value increase.
Remember that we’re saving $1,901 per year with the EV, so the ROI on this is $1,901 / $1,373 net cost, which equals 138% year 1 return on your money. In other words, you’re spending a net $1,373 to save $1,901. Good deal!
If you subtract out the electric car factor, then it’s $832 net electric bill savings (after taking out Duke’s $35/mo “minimum bill charge”) divided by $1,373, which is still a 60.5% ROI by doing the efficiency and solar measure to power the house by itself. Still pretty great in my opinion.
Summing it All Up and Final Thoughts
This project was insane, and it really got the best of me at times. As I said, I’m not any kind of professional flipper or renovator.
But it does feel good to hit these goals. To actually create a true netzero home while powering the EV, and to stay within budget and well below the median average home price in the area.

It also follows equity and wealth-building principles that we real estate investors use to work towards our own financial freedom while helping the planet at the same time.
And best of all, now a nice family gets to enjoy it while I was able to move back to Denver, Colorado, where I am working to keep building this company.
I hope you enjoyed this story and the numbers. To get started on your own, check out our free energy efficiency guide. It has dozens of simple DIY efficiency projects that you can do in your home to start bringing that bill down.
You can download that from this signup form, and get our updates and newsletters as well:
In the future, I’m planning to build an online course, calculators, and more guides to help boil all this down, so a lot more of you can do your own netzero project while keeping the costs within reason. Thanks so much!
Please tell me where you put the heat pump water heater in this house. I didn’t see it in the garage. The listing on Home Depot says it needs a lot of space, needs to be in a warm area and exhausts air. Thank you.
Hi Kathleen! I did indeed put it in a corner of the garage. Check out this post and the video featured as well! https://www.attainablehome.com/heat-pump-water-heaters-in-your-garage/