

Founder | BPI® Energy Auditor Certified Professional
According to the Environmental Protection Agency (EPA), air sealing significantly reduces household energy bills. Unfortunately, drafts from openings within your home’s building envelope can usher mold growth, pest infestation, and other frustrating occurrences.
One of the hot spots for these holes is in the bathroom, around where the exhaust fan is situated.
This guide will explain the processes necessary to seal your bathroom exhaust fan and give tips on draft prevention. So without further ado, let’s get into it!
How to Air Seal Around the Bathroom Exhaust Fan
You can air seal and prevent drafts around your bathroom exhaust fan using a caulk gun and backdraft damper. A common location for drafts includes the spaces between the fan and the wall. The sealing process is best done during the installation of the fan.
1.) Make Accurate Opening for Fans
Installing an exhaust fan in your bathroom is necessary to take the air out while you have your bath. However, installation needs to be done carefully because incorrect installation may cause more air leaks.
You can install your bathroom exhaust fan ductwork in many places, but the attic isn’t a place you should consider. The best place to vent your exhaust fan is through the roof or the walls.
Some factors to consider when choosing the location of your bathroom exhaust fan include the following:
- The closeness to the bathing area – this consideration is essential, so your exhaust fan works effectively in the most affected area.
- The venting route – the ideal course is to take the bathroom air outside the home as swiftly as possible. Hence, it would be best if you had the shortest possible distance from the fan to the duct leading outside.
- The bathroom design – your bathroom location, size, and design will determine the type and number of exhaust fans you need.

It is always better to leave bathroom exhaust fan installation to the professionals and experts. It does not mean you can’t DIY; it’s only better to have the expert do it because they will have the right tools and experience.
Remember to discuss and ensure that the professional takes care of potential air leakages during the installation.
Once you have decided on the location for your exhaust fan installation, you must make a cut. The hole needs to be the exact size required to contain the fan.
It’s almost impossible to cut out the accurate size for an exhaust fan, but here is the process required:
- First, understand the wall type around the exhaust fan location.
- Then, check the shape of the exhaust fan and measure it correctly.
- Finally, get the right tools to cut through the wall and achieve the shape of the fan. Some exhaust fans have curves at the edges, requiring special tools.
The accuracy of the opening depends on the tools you have at your disposal. The more accurately you create the exhaust fan opening, the less you have to worry about sealing.

According to Family Handyman, some of the required tools to create the opening include:
- A drill
- Drywall saw and jig saw
- A utility knife
2.) Install Fan and Inspect the Gaps
After creating the opening, the next step is to fix your fan into the slot. Getting a professional on board will ensure that you don’t have to worry about things like electricity and the accuracy of installation, so keep that in mind before you decide if you should DIY this.
Here is a brief overview of the installation process:
- Find and cut a vent location – the exterior vent point should be at most six feet from the fan.
- Install the fan housing first – the housing is the first thing to install, and you must align it correctly.
- Link up the fan housing to the vent on the exterior.
- Install the fan in its housing and check the connection.
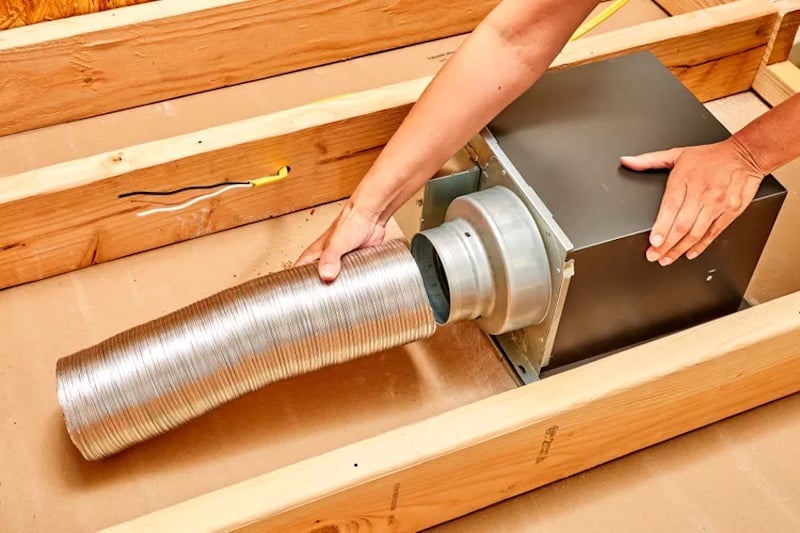
No matter how accurate you are at installing your exhaust fans, you can not get precise measurements. After the installation, you’ll undoubtedly have gaps, which will determine the air-sealing process.
3.) Consider Indoor Air Sealing Techniques
Air sealing is an integral part of bathroom exhaust fan installation because there will be leakages.
For your bathroom exhaust fan situation, you have two air-sealing options:
- Caulk – a caulk gun works to fill small cracks and holes in your walls.
- Filler – this option seals bigger holes by expanding to fill them.
Using the caulk gun and filler for air sealing is simple and requires little experience. The only thing you need to worry about is the type of tool that you have.
Caulk gun types are endless, with unique features for different situations. However, we strongly recommend the Newborn 930-GTD Drip-Free Cradle Caulking Gun. This caulk gun is excellent for materials with low viscosity, and you don’t have to apply pressure while using it because of its smooth pressure rod.

A caulk gun may not perform excellently when the hole or opening is higher than 0.25 inches (0.64 cm), regardless of its quality. In this case, filler foam is a better option, as it will fill the hole through expansion.
Sometimes, the expansion of the filler foam may be too much, so you need to cut it to fit the hole between the exhaust fan and the wall.
4.) Insulate When Necessary
You are at risk of losing up to 40% of indoor energy when there is any form of air leak. Air sealing reduces the chances of such energy loss, but it does not always work. Sometimes, insulation is a better option than sealing.
There are three general techniques used for air sealing:
- Insulation – most people confuse insulation and sealing because they perform almost the same tasks. You can insulate anything, including the attic, wall, and ceiling. These insulations come in different types, but rigid foam board is the best.
- Caulking – a caulk gun is a device to seal small holes around the home. Caulk guns have different types with corresponding functions. Hence, be sure you have a caulk gun that will take on your tasks.
- Weatherstripping – the holes around our windows and doors are enough to lose enough air. Weatherstripping is a material you can add to those tiny openings to ensure no air escapes.
Weatherstripping is a sealing technique for only windows and doors, so it is not functional for air-sealing exhaust fans.
Using filler instead of a caulk gun to air seal the holes around the exhaust fan is also an insulation technique.
There are different materials you can use to insulate and air seal the gaps around your exhaust fan, including:
- Open-cell spray foam insulation
- Closed-cell spray foam insulation
- Rigid foam board insulation
Some experts may consider fiberglass insulation but do not use this insulation type for your bathroom fan. From our experience and other research, fiberglass loses most of its insulating properties when wet.
5.) Check Exterior Walls
During the installation of exhaust fans, the professional will cut some parts of the exterior walls to install the vents. These openings are perfect for air to leak out if you do not cover this hole.

Sealing these holes on the exterior walls is similar to interior air sealing—you must first inspect the holes and measure the size to know the best way to seal them.
The caulk gun will do justice if the wall hole is less than 0.25 inches (0.64 cm). But if the gap is more extensive, an insulation material is the better option.
6.) Check the Exhaust Fan Box
Sometimes, your bathroom fan may leak, and the problem may not be from the walls. Some exhaust fans have designs that promote leakages in their housing.
The air lost through the casing of your bathroom exhaust fan can be more than wall leaks, and since it’s hard to notice, it will increase energy bills.
Here’s how you can stop it:
- Get insulation material – the idea is to cover up all the exhaust fan housing edges correctly. Get any one of the insulation materials mentioned earlier. The wall type is vital in determining the insulation material—sometimes, plywood is enough.
- Mold material into a box – after getting the insulating material, create a box with five sides with the material and tape them. Remember to create an opening to cater to the exhaust duct for the fan’s vent.
- Insulate the box with attic insulation – there are different attic insulation types to choose from based on different needs.
Types of Attic Insulation
Attic insulation is a way of using insulating materials in interior spaces like attics to prevent energy loss.
Some materials used in this procedure include:
- Spray foam insulation – there are two types of spray foam insulation: open-cell and closed-cell. This insulation type is getting popular for attic use because of its high R-value, amongst other benefits.
- Fiberglass batt insulation – this insulation type is popular because it is affordable, easy to use, and works for many home parts. However, it isn’t ideal for attic insulation because of its low R-value.

- Blown-in insulation – another type of fiberglass insulation that is a bit stronger. You can blow “loose-fill” materials like glass wool, stone wool, or cellulose into gaps. These materials fill the holes effortlessly, preventing drafts.
As these are specialized methods of insulation with materials that can be hazardous if mishandled, stay safe and get the professionals on board for this.
7.) Install Backdraft Dampers
Most exhaust fans and HVAC systems come with a damper; you need this component to work fine to avoid air leakage.
Based on operations, we have four damper types, including:
- Safety dampers – these dampers come in different types to protect buildings from damage due to fire and smoke by preventing these from spreading.
- Backdraft dampers – this style only allows air to flow in one direction, away from your home. They are best used in spaces like bathrooms.
- Balancing dampers – great for managing drafts as they regulate air pressure between rooms.
- Control dampers – also known as volume control dampers, they are used by HVAC systems to determine how much air needs to be pumped in and out of a room at any given time.
The backdraft damper is the choice for most bathroom exhaust fans, and many brands are making their models. One damper I can vouch for is the AC Infinity 6″ Backdraft Damper. You can install this damper vertically or horizontally, and apart from controlling airflow, it also hinders debris from getting into the duct.
The backdraft dampers can come in a single or flanged frame model with different installation techniques. It is better to read the instructions to ensure the best installation methods.
Conclusion
Exhaust fans are essential to ventilation in places like the bathroom and kitchen. However, they can cause drafts and increased energy bills if not installed correctly.
Air leakages in the home are very regular, and it is impossible to stop them completely. However, you can minimize these leakages as much as you want, especially if they’re around the exhaust fan. For complete air sealing, inspect the interior and exterior of your exhaust fans regularly.
We hope this article proves helpful in your bathroom fan installation endeavors. Best of luck!
Sources
- Office of Energy and Renewable Energy: Air Sealing Bathroom and Kitchen Exhaust Fans
- Green Attic: Attic Air Sealing And Weatherization
- Trust Remodelling: Bathroom Fan Venting Tips & Guidance
- HVAC Buzz: Why Bathroom Fan is Letting in Cold Air (hot air in the summer)
- HVAC Buzz: Ultimate Backdraft Damper Guide (All You Need to Know)
- International Association of Certified Home Inspectors: Inspecting for Air Sealing at Kitchen and Bathroom Exhaust Fans
- Seal Insulate and Ventilate: Air Sealing Techniques
- Attainable Home: Home Air Sealing: Fix These 6 Common Leaky Areas for Savings
- Family Handyman: Pros and Cons of Attic Insulation Types
- Thermal Engineering: What is Attic Insulation – Roof Insulation – Definition